Sunday, 18 September 2011

Reindeer Card

I made this card as my entry into this weeks Willow Sketchie Challenge. Another Christmas card for my card box, at this rate I should have enough to give all my family and friends for Christmas. Hope you all like it. :D

Reindeer Card


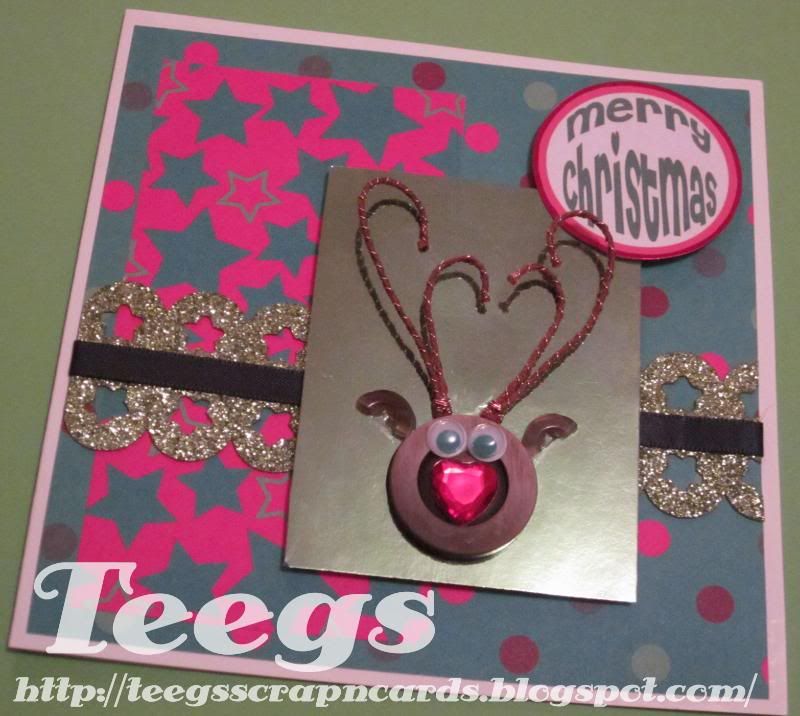
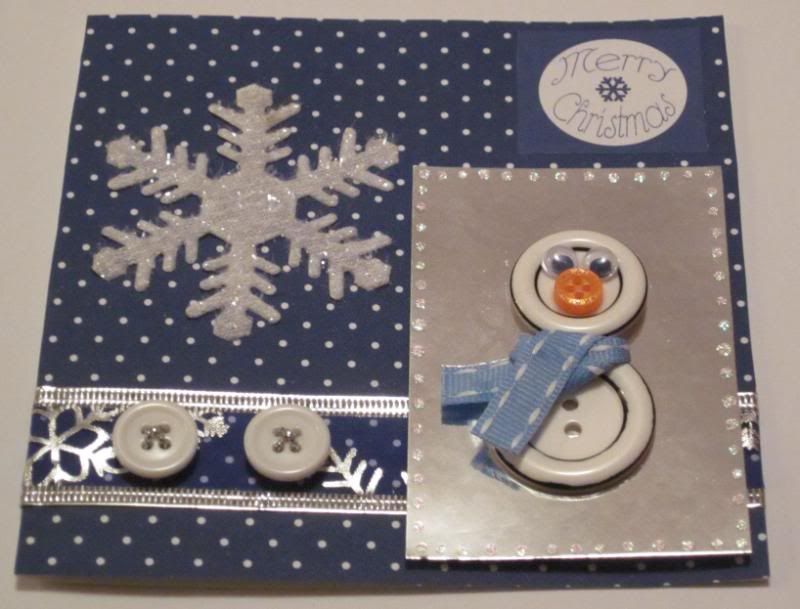
I used a plain white card as my base card, and cut a square out of polka dot Christmas patterned paper slightly smaller than the card itself. I then cut a rectangle out of star Christmas patterned paper, which I glued down the left side of the polka dot paper. I cut 2 green glitter star border stickers to the length of the width of the polka dot paper. I then stuck them across the polka dot paper (one above the other, with the flat edges meeting) about 2/3 of the way down. Next I glued a dark green ribbon over the top of where the border edges met. I then glued the Polka dot paper to the card itself.


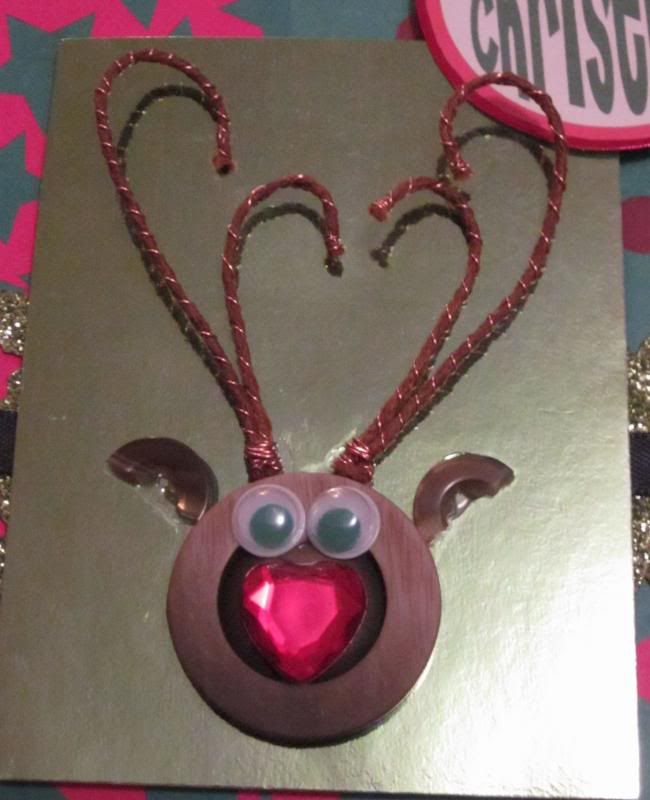
This time for my image element I made a reindeer out of buttons. I used a large brown button for his head, and cut a small brown button in half for his ears. For his red nose I used a red heart shaped diamontie, which I glued along with 2 googly eyes to the large brown button. I glued the head onto a rectangle of green foil card, and then positioned and glued 1 ear to either side of his head. His antlers were a bit trickier, so I thought I'd give you a more detailed how to pic...


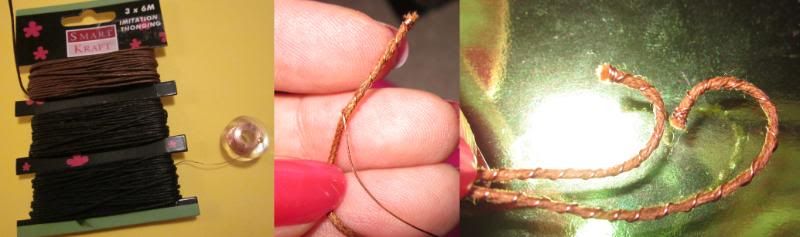
For the antlers you could just use thick gauge beading wire, but I thought it looked a bit plain for this particular card, so I decided to jazz it up a bit. I used brown imitation thonging and thin gauge copper toned beading wire. I wound the beading wire around the end of the thonging several times and crimped it so that the beading wire didn't slide off the thonging. Next I simply held the beading wire in 1 hand and twisted the thonging in the other, this then caused the beading wire to wrap around the thonging. I did this until I had the length I required for the piece of antler, I then wrapped the beading wire around the end of the thonging several times and crimped it once again. I repeated this another 3 times for each antler piece (4 in total, 2 long and 2 shorter). I then bent the pieces into a nice curvy shape, and holding near the bottom of a pair (1 long and 1 shorter) I wrapped beading wire around the bottom of them to hold them together, and then repeated for the other pair. 

I then glued them onto the green foil rectangle at the top of the button head. I then used double sided foam tape to attach the green rectangle to the card. Lastly I made a circle Merry Christmas sentiment, which I glued onto a circle of red foil card and then attached to the card also using double sided foam tape.

I really enjoyed making the reindeer, and I would like to thank Anne-Marie from Willow Sketchie Challenge for an awesome sketch. Good luck to all that enter. :D


Wednesday, 14 September 2011

Willow Sketchie Challenge Mega Prize

In a fortnight Willow Sketchie Challenge are giving away a Letraset wallet filled with Promarkers. All you have to do to be in with a chance to win this amazing prize is go to the Willow Sketchie Challenge blog on the 22nd September 2011, grab their sketch for that week's challenge, create a card using the sketch, post it to your blog and go back to the Willow Sketchie Challenge blog and enter you details on the challenge post before the closing date. Good luck to all that enter. :D

Thank you Willow Sketchie Challenge DT

This morning I visited the Willow Sketchie Challenge blog to see if they had announced the winner of this week's challenge. What a lovely surprise to discover that I was in fact the winner. :D And whilst I know the winner is only randomly drawn, I would like to thank the Willow Sketchie Challenge DT for the great blog and sketches that they provide for entrants such as myself week after week. :-* If it wasn't for their challenges I proberly wouldn't make myself sit down and make a card each week... Lol... So thanks for keeping my brain ticking and my fingers creating :-*

Monday, 12 September 2011

Snowman Card

Here's my card for this week's Willow Sketchie Challenge. Thought I'd make another Christmas card. Hope you all like it. :D

Snowman Card


For this card I used a plain white base card, which I covered in blue and white polka dot paper. I glued a white material snowflake embellishment to the left side of the card. For my sentiment I used one of my Free Merry Christmas Snowflake Sentiments, which I glued to the top right of the card.


I used a silver and blue snowflake ribbon across my card. I threaded silver cord through 2 white buttons and glued them onto the ribbon.


Lastly for the image element I made a little snowman out of 2 white buttons (1 slightly smaller than the other). I made a scarf for the snowman out of blue ribbon and glued it to the top of the larger button and left to dry. I glued a small orange button (for a carrot nose) and 2 googly eyes onto the smaller button and also left to dry. Once both were dry I cut a rectangle out of silver foil card and glued the larger button to it. I attached the smaller button (or head) to the silver foil rectangle with foam double sided tape (to lift it up a bit so it was inline with the larger button). I put dabs of glitter glue around the silver foil rectangle and left to dry. Once dry I attached the silver rectangle to the card with double sided foam tape.

I had a lot of fun making the little snowman, and I would like to thank Clairebears from Willow Sketchie Challenge for such a great sketch. Good luck to all that enter. :D

Sunday, 11 September 2011

Free Merry Christmas Snowflake Sentiment

Here's a free Merry Christmas Snowflake themed Sentiment for you to download. I have uploaded 3 variations. Simply click on the image to open it in it's own window then right click on the image and save. :D

Free Merry Christmas Snowflake Sentiments


 Example Of Use

If you use these free items and post your creation to a blog, please leave the link in comments, so that myself and others can see it. Thanks :D 

Tuesday, 6 September 2011

Christmas Tree Card

I made this card tonight for this week's Willow Sketchie Challenge. Thought seeing as Christmas is quickly approaching us that I would make a Christmas card for this week's challenge. Plus the sketch and DT cards inspired me to do so. ;) Hope you all like it. :D

Christmas Tree Card

For this card I used a red textured card as my base card. I then cut 2 rectangles out of Christmas Patterned Paper and attached them to the card. I made a "Merry Christmas" sentiment which I glued to the bottom right of the card. For the star elements I used gold wooden stars, which I attached with double sided foam tape.

As per usual with me, when it comes to the image element I like to think outside of the box. ;) So for this I made a little Christmas Tree, using little triangles which I cut out of green n white Polka Dot paper. I made little cones out of the triangles, and glued it at the back where the edges met. I then turned them back over n pressed down on them with my finger to create a diamond sort of shape. Then I simply layered them inside each other, gluing as I went. I cut the trunk out of gold paper and glued it to the back of the tree. I then glued the tree to a white paper square, which I then glued to a slightly larger green foil card square. I then attached it to the card using double sided foam tape. Lastly I finished it off by running some glitter glue around the edge of the white paper square.

I had so much fun coming up with the idea of the little tree and creating it, I would like to thank Claire from Willow Sketchie Challenge for such a fun sketch, and also the DT for such great inspiration. Good luck to all that enter. :D


Monday, 5 September 2011

September Pixie Kit Giveaway

Pixie Dust Paperie September Giveaway
Pixie Dust Paperie is giving 1 lucky person the chance to win their My Funky Valentine Pixie Kit. All you have to do to be in with a chance at winning this fantastic prize is become a follower (to get one chance) and post the giveaway on your blog with a link back to Pixie Dust Paperie, Then go back to the giveaway page and leave your blog link in the comments (to get another chance).
Good luck to all that enter. :D