Tuesday, 18 October 2011

Thank You Geisha Card

Here's my entry in this week's Willow Sketchie Challenge that I made tonight. I decided to make a Thank You card for a family friend who is looking after my cat, as My Boyfriend and I are going away on Thursday for a week. Hope you all like it. :D

Thank You Geisha Card


I used a red textured card as my base card, I then cut a square out of gold paper 1cm smaller than the card itself and glued it to the center of the card. I made a gold and red Thank You sentiment on the computer and glued it to the bottom left corner of the card.


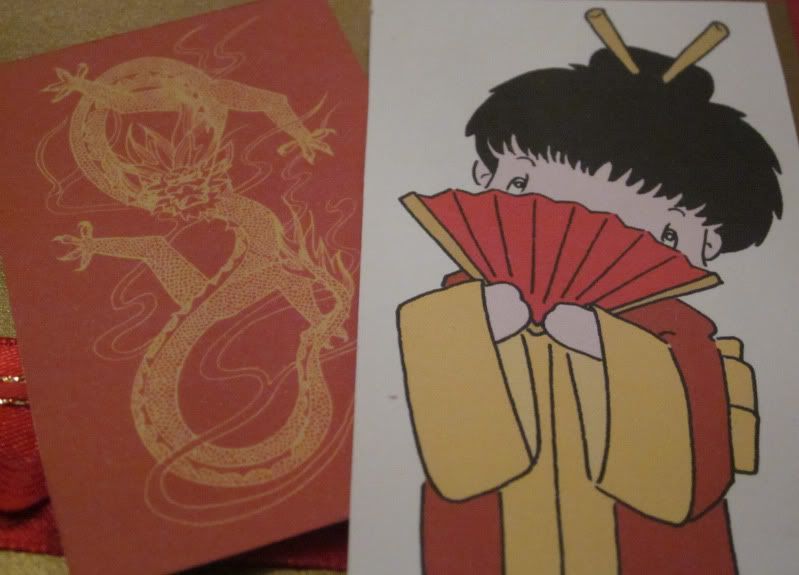
For the main image element I used a Sliekje Free Japanese Girl Digi Stamp, which I coloured in using Photoshop. For the 2nd image element I used a Free Chinese Dragon Photoshop Brush By Hawkesmont which I printed in gold on a red background. I printed both on white card and attached them to the card using double sided foam tape after finishing the other elements.


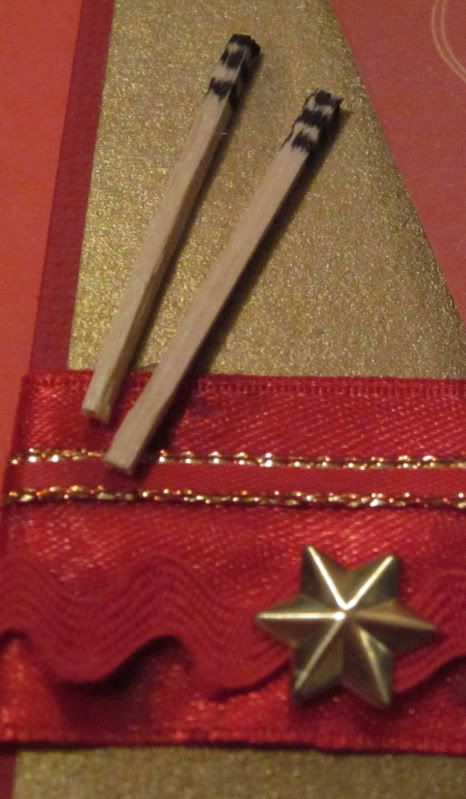
For the final elements I used a thick red ribbon which I glued across the card about 2/3 of the way down. I then glued a thin gold trimmed red ribbon near the top of the thick red ribbon and a piece of red ric rac towards the bottom. I attached a gold star brad to the ric rac. I then made 2 miniature chop sticks out of a paddle pop stick which I cut to size and shape, I also used a black marker to draw lines around the top of them. I used PVA glue to stick them near the top left of the thick red ribbon.

I enjoyed making this card and the little chop sticks and I would like to thank Miria from Willow Sketchie Challenge for an awesome sketch. Good luck to all that enter. :D

Wednesday, 12 October 2011

Beyond The Page Mum Album

I made this beyond the page album for my Mum for Mother's day last year. Hope you all like it. :D

Beyond The Page Mum Album


I used a pre cut wooden Mum album which I picked up from my local markets. 2 mini white frames, which I painted in contrasting colours and put a photo in each, 1 of myself and another of my Brother both as children. I used 2 split rings to hold the album together and tied ribbons and fibers to them. I covered each piece of the album in a variety of contrasting purple and pink papers and painted around the edges using black acrylic paint.


On the back of the 'M' I used a metallic pink craft gauze and pink and white braded paper flowers and brads. On the 'U' I stuck a recent photo of myself, and I stamped a 'J' (as my Mum's name is Jenny) onto a white craft stone using black Stayz on ink.


On the back of the 'U' I tied a purple ribbon and bow, stuck 'MUM' letter stickers down the left side and stuck a recent photo of my Brother. On the final 'M' I stuck the mini frame with my Brother's photo as well as some braded paper flowers (I used brown, black and pale pink). I also gave my Mum a plastic plate stand, so she could stand it up.

Snowflake Card

Here's my entry that I made tonight for this week's Willow Sketchie Challenge. Have been so busy lately that I decided to keep it relatively simple as I was running out of time to get it in. ;) This week as well as a fun sketch Hazel wanted to see snowflakes, so I decided to use them as my theme. Hope you all like it. :D

Snowflake Card


I used a white base card which I covered with a white and blue snowflake paper which I made. I then cut a rectangle (8cm x 6cm) out of a reversed colour blue and white snowflake paper I made, which I glued 2cm down on the right side of the card. Next I printed a blue snowflake out of Photoshop, cut around it and coated it in glitter glue. Once it was dry I glued it on a 45 degree angle below the rectangle.


To make the big snowflake I cut 2 snowflakes the same size out of white card and then coated them both in glitter glue. I then cut a square out of blue metallic paper (10 x 10cm) and glued it to a piece of white card the same size (to give it more strength). Once the glitter glue was dry I glued one of the snowflakes to the Metallic blue square. I then folded the 'arms' of the 2nd snowflake in half and flattened out the 'branches' off the arms. Next I glued the middle of the 2nd snowflake to the middle of the first on an offset angle. I then attached the square to the card using double sided foam tape. Lastly I made a little Merry Christmas sentiment by rolling in the ends of a small white card rectangle, I then wrote the text in freehand and glued it to the top right of the square.

This was a fun quick card to make and I would like to thank Hazel from Willow Sketchie Challenge for a great theme and sketch. Good luck to all that enter. :D

Wednesday, 5 October 2011

Christmas Tree Tent Card

Finally found the time to make my entry into this week's Willow Sketchie Challenge tonight. This week they added a twist to the sketch and you either had to make a tent or easel card. I decided on a Christmas themed tent card. Hope you all like it. :D

Christmas Tree Tent Card


I used plain white card to make my tent card. I covered the front piece of card in green and white polka dot card, and the back piece in red and white polka dot card. I cut a square slightly smaller than the front piece of card out of green textured paper, and cut another square out of the center of it to make a frame. I then glued 2 pieces of red holly ribbon (slightly shorter in length than the card) down the right side of the front piece of card. Next I glued the green frame to the front piece of card. I then cut a circle out of the front card to the left of the green and white polka dot card.


For my image element I decided to make a little 3D Christmas tree. I drew a Christmas tree on a scrap piece of paper and then cut 2 of them out of green textured card. I cut a slit 1/2 way down one of the trees, and I also cut a triangle out of the bottom about 1cm up. I then cut a slit 1/2 way up the other tree. I folded about 1cm of the bottom of the first tree to a 90 degree angle and used this to attach it to the base of the tent card. I then slid the 2nd tree onto the first at a 90 degree angle. I then folded and made some little tabs (kind of like a cube with only the sides) out of white card which I attached to the front and back cards as well as the base of the 2nd tree on the front and back, so that if the card was folded closed the tree would spring back out when it was opened again. Lastly I closed the top of my tent card by making small slits about 1.5cm apart and 0.5cm from the top of the card. I then threaded gold edged red ribbon through the slits to bind the card closed.


For more info on how to make a tent card Check out Hazel's great Tent Card Tutorial. It helped me heaps, thanks Hazel. :-*


I had so much fun making this card, was also great to learn a new technique and I would like to thank Kelly from Willow Sketchie Challenge for a fun twist and sketch. Good luck to all that enter. :D

Friday, 30 September 2011

Apple Card

Here's a quick card I made for my Boyfriend's brother for his Birthday. He's a huge Apple fan, so I decided to make him a card incorporating the Apple logo. The photo doesn't bring up the colours that well, but the apples are red and the card is a lime green. Hope you all like it. :D

Apple Card


I used a lime green card as my base card. Using a sheet of Apple logo stickers I laid a piece of scrap paper over the top and shaded over it using a lead pencil until I could clearly see the outline of the apples. I then went over the outline of the apples using a lead pencil. Next I cut the apples out and traced around them onto the back of a piece of red paper. I then cut the apples out (and put the leaves aside) and glued them together so they overlapped. Then I glued the apples and leaves onto a piece of pale green striped paper and trimmed around the edges. I then glued it onto the card. Lastly I glued some fluorescent foam letters to the apples to spell out "Happy B'day". :D

Wednesday, 28 September 2011

Christmas Stocking Card

Here's my 3rd and final entry in this week's Willow Sketchie Challenge. Phew, made it just in time. ;) Again I decided on another Christmas card, as Christmas is very quickly approaching us. Hope you all like it. :D

Christmas Stocking Card


Again I used a red textured card as my base card, I then cut a square out of gold paper slightly smaller than the card itself and glued it to the card. Next I cut a slightly smaller square out of green textured card and glued it to the card. Again I cut a slightly smaller square out of Christmas patterned paper and glued it to the card. I then cut 2 small rectangles and 1 small square out of gold paper. I made red "Santa", "is", "coming" sentiments in Photoshop, printed them, trimmed around them and glued them to the rectangles and square. I then glued the rectangles and square down the right side of my card.


For the image element I made a Christmas stocking. Firstly I sketched a stocking shape onto a scrap of paper, I then cut it out of red textured card. Next I layered and glued a variety of Christmas ribbons across the stocking. I also folded the ends of the ribbon over the back of the stocking and glued them down. For the final touch to the stocking I glued 3 white Pom poms across the top of it. I then cut a rectangle out of gold paper and glued it to the left side of my card. Lastly I glued the stocking to the gold rectangle.

Once again I had great time making this card, and I would like to thank all of the DT from Willow Sketchie Challenge for a fantastic prize for this week's challenge as well as a great sketch. Good luck to all that enter. :D

Tuesday, 27 September 2011

A Spot Of Gardening Christmas Card

Well has been a busy few days for me, but I have finally managed to take some time out to finish my 2nd entry in this week's Willow Sketchie Challenge. Am hoping to have the 3rd card done tomorrow. Once again I have used the Willow "A Spot Of Gardening" digi stamp that I won in their challenge 2 weeks ago, although I have made a slight twist to it, hope the willow DT don't mind. Hope you all like it. :D

 A Spot Of Gardening Christmas Card


I used a red textured card as my base card, I then made a red and white polka dot paper which I cut  a square out of slightly smaller than my base card and then I glued it to the center of my base card. Next I cut a square slightly smaller than the red and white polka dot paper out of dark green textured card and I then once again glued this to the center of the card. Lastly I cut another slightly smaller square out of a green and white polka dot paper I made and also glued this to the card. I cut 3 rectangles out of red textured card and made a "Merry" and "Christmas" sentiment which I glued to 2 of the rectangles. I glued 2 paper flower embellishments to the 3rd rectangle. I then glued the rectangles down the right side of the card.


For my "A Spot Of Gardening" digi I decided to make it as Christmasy looking as possible. Once again I coloured it in using Photoshop, and trimmed around the image. I made a little santa hat for Winnie by cutting the shape out of red foil card, I then glued on a white pom pom and used cotton wool for the fluffy trimming. I cut her dress out of dark green textured card and again glued cotton wool on for the trimming. I also glued cotton wool onto the top of her boots. I replaced the shovel in Winnie's hand for a candy cane, which I made out of red foil card and white paper strips. I then glued all of these onto the digi. I cut a rectangle out of red foil card and attached Winnie to it, and then glued it onto the left side of the card.

Once again it has been a blast making this card, and I would like to thank all of the DT from Willow Sketchie Challenge for such a lovely digi and a great sketch. Good luck to all that enter. :D