Tuesday 26 July 2011

Frog Belated Birthday Card

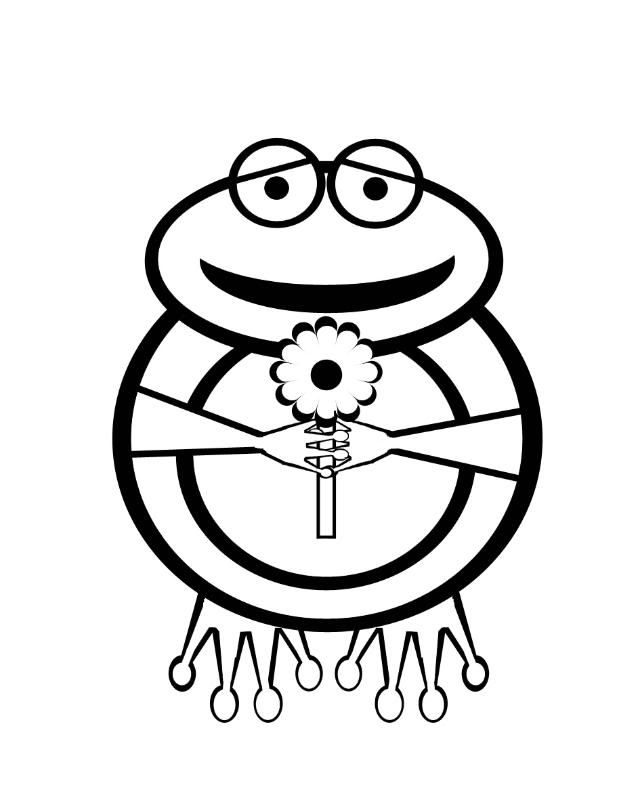
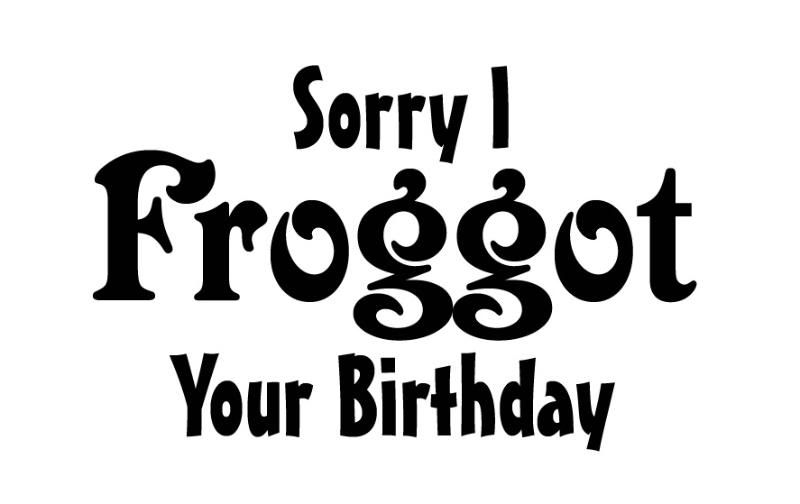
Here is a Belated Birthday card that I made today using my Free Frog Digi Stamp and Sentiment :D

 Frog Belated Birthday Card


The digi stamp and sentiment I used for this card was the free Frog Digi Stamp and Sentiment available on my blog at http://teegsscrapncards.blogspot.com/2011/07/free-frog-digi-stamp-and-sentiment.html

I printed them on art paper and then coloured the frog in using Water colour pencils, which I then used a wet brush to blend the colours. For the sentiment I went around the "froggot" with a green marker and then around the whole text with a pastel green gel pen. I used a green texture card for my base card. I then cut a rectangle out of pink paper, 2cm smaller in width than the card itself, and I used scalloped scissors to cut down one side. Next I cut a rectangle out of green polka dot paper, 1cm smaller than the pink rectangle, again I used scalloped scissors to cut down one side (although I did use a different patterned pair to the pink rectangle). Then I simply glued the green rectangle to the pink one, and both rectangles to the card itself. I then glued the digi stamp and sentiment onto the green rectangle. I attached a white brad to the middle of 2 pink paper flowers, which I then glued to the middle of the side of the card. I then cut 2 leaves off the stem of some silk flowers and glued 1 above and 1 below the pink flower. :D

Monday 25 July 2011

Free Frog Digi Stamp And Sentiment

Here's a free Frog digi stamp and Belated Birthday sentiment for you to download. Simply click on the image to open it in it's own window then right click on the image and save. :D

Free Frog Digi Stamp

Free Belated Birthday Sentiment


 Example Of Use


If you use this free Digi Stamp and post your creation to a blog, please leave the link in comments, so that myself and others can see it. Thanks :D

Worldwide Candy Giveaway

Tabby Craft Designs Candy Giveaway

Head on over to Tabby Craft Designs to try your luck at winning the Vintage inspired candy that she has up for grabs. All you have to do is enter your details and post this great giveaway on your blog. While you are there sign up to follow her blog... I know I did ;) :D

Sunday 24 July 2011

Cup Cake Birthday Card

Here is a Birthday card that I made today using my Free Cup Cake Digi Stamp :D

Cup Cake Birthday Card


The digi stamp I used for this card was the free Cup Cake Digi Stamp available on my blog at http://teegsscrapncards.blogspot.com/2011/07/free-cup-cake-digi-stamp.html 

I used 1 at original size and shrank down the other 4. I printed them on art paper and then coloured them in using Water colour pencils, which I then used a wet brush to blend the colours. I used a black pearlized card, which I glued the 4 smaller cup cakes to, starting with the green 1 n layering each on top as I went. I then glued the big cup cake to a piece of card (to strengthen it) and cut it out. Next I attached doubled sided foam tape to the back of the big cupcake (to give it a 3D effect) and attached it to the card. I then used different coloured letter stickers for the words "Happy Birthday". :D

Friday 22 July 2011

3 Free Tags

Here's 3 free Tags for you to download. Simply click on the image to open it in it's own window then right click on the image and save. :D

Free Birthday Girl Tag


Free Butterfly Garden Tag 


Free School Tag

If you use these free items and post your creation to a blog, please leave the link in comments, so that myself and others can see it. Thanks :D

Free Belated Birthday Sentiments

Here's a free Belated Birthday Sentiment for you to download. I have uploaded 2 variations. Simply click on the image to open it in it's own window then right click on the image and save. :D

Free Belated Birthday Sentiments


If you use these free items and post your creation to a blog, please leave the link in comments, so that myself and others can see it. Thanks :D

Thursday 21 July 2011

Free Cup Cake Digi Stamp

Here's a free Cup Cake digi stamp for you to download. Simply click on the image to open it in it's own window then right click on the image and save. :D

Free Cup Cake Digi Stamp


 Example Of Use


If you use this free Digi Stamp and post your creation to a blog, please leave the link in comments, so that myself and others can see it. Thanks :D

Wednesday 20 July 2011

Playing Card Mini Album

This mini scrapbook album was made out of playing cards. :D

Playing Card Mini Album


You will need a deck of playing cards, 3/16" eyelets, plain coloured or patterned card, a laminator, a split ring, photo's and a variety of embellishments that you wish to use (eg. brads, rhinestones, paper flowers, letter stickers, stickers etc).

 First you will need to shrink or cut all your photos to the size of a playing card.


Then glue them onto your playing cards, on both sides.


You may also wish to use some plain and or patterned card to add titles and stickers etc to your album.


Next laminate each of your pages, this will further protect your photo's.

Then using a 3/16" hole punch, punch a hole in the top left or right corner of each of your album pages. Next set a 3/16" brad in each of these holes.


Then add any embellishments you wish to use... Paper flowers, brads, letter stickers etc.


Sunday 10 July 2011

2 Birthday Cards

Here are 2 birthday cards that I made today :D

3 Cats Card


The digi stamp I used for this card was a Sliekje free digi stamp available at http://sliekje.blogspot.com/2010/03/300.html which I coloured in using coloured pencils. I used a red pearlized card as my base card, and cut a pink texture paper rectangle 1cm smaller than the card. I then cut a red foil paper rectangle 4cm smaller that the pink one. I glued the digi stamp in the middle of the red rectangle and left it to dry. Next on the back of the pink rectangle I drew another rectangle 2cm smaller, then using my double Cutter Bee Bug I ran it along the rectangle to mark the holes for stitching. I then used red cotton to sew the double lines. I then glued the red rectangle to the pink rectangle. Next I stitched a hot pink flower button to the top left corner of the pink rectangle using pale pink cotton. Lastly stick the rectangles to the card. :D


Blue Birthday Bears Card


The image I used for this card was from A Canary's Diary and is available at http://ink-and-feathers.blogspot.com/2010_05_01_archive.html which I coloured in using coloured pencils. I used a black pearlized card as my base card, and I cut 3 5cm x 5cm squares out of blue foil paper. I then glued the bear image to one of the squares and set aside to dry. On a sheet of white A4 paper and using a black marker and a pale blue gel pen I designed the "Happy Birthday" text, by simply writing the letters using the thick end of the marker, then using the fine end I went around the letters in a dot n line pattern, I then filled the space between the letters and pattern with the pale blue gel pen. I then cut around the text (leaving a little white around the edges) and glued then to the remaining squares. Lastly I glued all 3 squares onto the card in a checkerboard pattern. :D

Thursday 7 July 2011

Free Paper & Embellishments - Shoe Girl

Here's a free paper and embellishment pack for you to download. Simply click on the image to open it in it's own window then right click on the image and save.

Free Shoe Paper


Free Shoe Tag
Free Girl Embellishment


If you use these free items and post your creation to a blog, please leave the link in comments, so that myself and others can see it. Thanks :D

Saturday 2 July 2011

Mother's Day Cards

I made these a couple of months ago for Mother's Day.

My Mum's Mother's Day Card


My Future Mother In Law's Mother's Day Card


Both cards r obviously the same except 1 is blue while the other is pink. These cards were quite simple to make. On the back of some metallic brown paper I drew a rectangle 4cm smaller than the card itself, I then drew a smaller rectangle inside that, 2cm smaller on the shortest side and 3cm shorter on the longest side, next I divided that rectangle into 3 smaller rectangles. Inside each of those rectangles I drew the letters M U M. Then it was as simple as cutting the original rectangle out of the paper and then cutting out the letters. I then chose a patterned paper that went with my colour theme, and again drew a rectangle on the back, this time 1cm smaller than the metallic brown rectangle. Next I glued the metallic brown rectangle to the patterned paper (it is important that you put the glue on the metallic brown rectangle because if you do it the other way round glue will b visible on your letters). Once that was dry I glued both rectangles to the card itself. Next I tied a variety of co-ordinating ribbons to a coloured plastic paper clip, which I then slid onto the side of the card (*HINT: Dab a bit of craft glue underneath the paper clip to prevent it from moving out of place) :D

Hand Bag Envelopes
I then made hand bag envelopes for the cards. Which was as simple as making a normal envelope, rounding off the flap, making 2 holes approx 5cm apart on the flap fold at the top, then threading ribbon through the holes and tying them off underneath, attaching a brad to the bottom middle of the flap and sticking a small square of adhesive velcro (hook-and-loop fastener) underneath the brad. :D

Friday 1 July 2011

Spiderman Anniversary Card

Recently my Boyfriend and I celebrated our 6 year anniversary. He loves Spiderman, and so I decided to make him a Spiderman anniversary card :D

Spiderman Anniversary Card


First I searched Google Images for a suitable Spiderman Image, as you can see I used a Spiderman and Mary Jane image as I thought this was appropriate for celebrating our anniversary. I printed out the image and coloured it in using coloured pencils, I then covered the entire image in Dimensional Magic to give it a shiny 3D looking effect. I left it over night to dry and then cut it out. Next I drew a web on the back of a piece of Scrapbooking glitter card and then cut it out to fit across the top of my card. I then glued the web onto a pearl black card, and the spiderman image on top of the web. Lastly I used some letter stickers to make the "Happy Anniversary Babe" :D

Birthday Cards

I had 2 Birthday's coming up, so I set about making some cards to suit each person

Sister In Law

For this 1 I used a free Adobe Photoshop floral vector and brush pack available at http://stockgraphicdesigns.com/category/free-vector-packs/ and a butterflies and Trails pack available from http://www.obsidiandawn.com/butterflies-n-trails-photoshop-gimp-brushes  I printed it on pink A4 paper and coloured it in with water colour pencils. I cut it out and then attached paper flowers with brads to it and stuck it onto a purple card. I then stamped Happy Birthday onto the card. :D

Future Mother In Law

I kept this 1 simple by just gluing a pre-made sentiment, some skeleton leaves and a braded paper flower onto a neutral coloured card. :D