Sunday, 8 January 2012

Wedding Card

I made this card today for our friend's wedding in March. Hope you all like it. :D

Wedding Card


I used white card as my base card which I then covered with a black and silver glittered patterned paper.


I coloured in a free Sliekje Wedding Digi Stamp in Photoshop, printed it on white card and trimmed it to a rectangle. I then cut a rectangle out of white card 1cm larger than the digi, and 2 more rectangles the same size out of 2 different coloured papers (I used pastel pink and pastel blue). I then cut the 2 coloured paper rectangles diagonally in half and glued one colour (blue) to the top half of the white card rectangle and the other colour (pink) to the bottom half. I then attached my digi to it and attached it to the top left of my card with double sided tape.

Next I glued various paper flowers and pearl heart shaped embellishments to the bottom right corner of my card. Lastly I made a "Congratulations" sentiment in Photoshop which I printed on white card, trimmed around and attached with double sided tape on an angle above the flowers.

Saturday, 7 January 2012

Happy Birthday Hamster Card

I made this card tonight as I had the itch to craft. Hope you all like it. :D

Happy Birthday Hamster Card


I used white card for my base card, which I then covered with a stripy glittered patterned card.


I then coloured in a free Sliekje Cupcake Hamster Digi Stamp in Photoshop, printed it on white card, trimmed it to a rectangle and matted it to pink polka dot paper. I then attached it with double sided tape to the top of my card. Next I also coloured in a "Happy Birthday" sentiment, printed it on white card, trimmed it to a rectangle and matted it to blue paper.


I then cut 2 lengths of blue satin ribbon, 1 to run the length of my card and the other the width. I trimmed one end of each to a point. I then attached one down the right side of my card and the other across the bottom. Next I attached the sentiment over the top of the ribbons in the bottom right corner of my card. I then stuck a little pink pearl to the end of each ribbon. Lastly I glued a little pink bow to the hamster's head and another to the bottom right corner of the sentiment.


Friday, 30 December 2011

3 Year Old Dinosaur Card

This is the card that I finally finished making tonight for my Nephew for his 3rd Birthday next month. He is dinosaur crazy, so made that my theme. Hope you all like it. :D

3 Year Old Dinosaur Card

I used white card for my base card. I then decided to make some jungle leaves for my background...


I drew 3 different shaped leaves onto a piece of white card and cut them out to make templates. I then traced round each of them several times onto the back of 3 different patterned/coloured papers. I then cut each leaf out, and outlined their edges with a black marker. Next I went around the edges of each leaf with black blending chalk, and used my finger to blend it further. I then glued them all over the card.

The image was a dinosaur colouring page that I found using Google Images. I coloured it in and added a "3" in Photoshop, printed it on white card and trimmed around it. I then attached a small bone button embellishment to it's neck using thin blue satin ribbon. Lastly I used double sided foam tape to attach it to the card.

Wednesday, 28 December 2011

Fishing Birthday Card

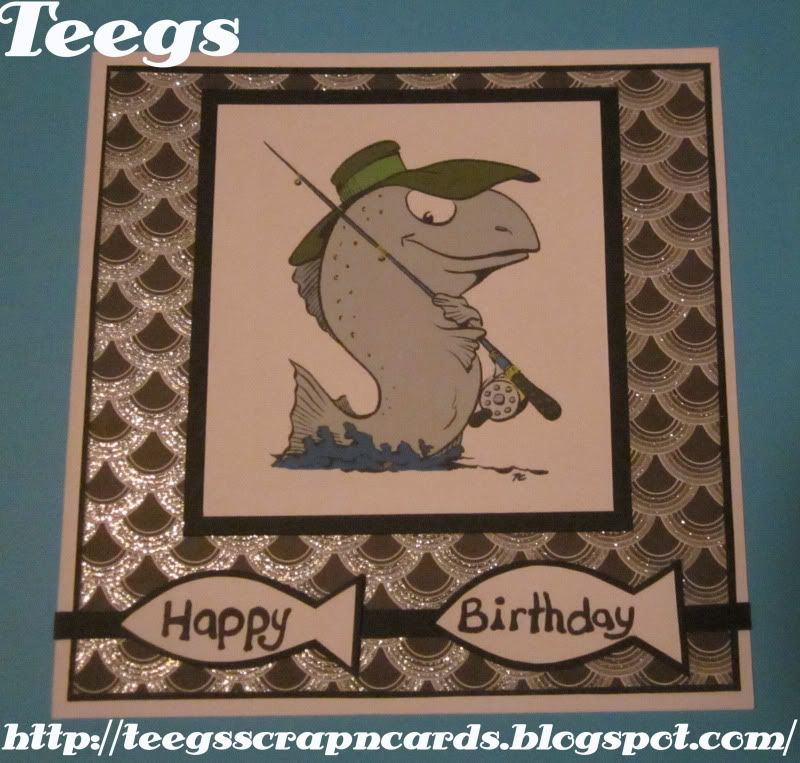
I made this card tonight for my Dad's Birthday which is a little over 2 weeks away. He enjoys fishing, so I decided to make that the theme for this card. Hope you all like it. :D

Fishing Birthday Card

I used white card as my base card. I then cut a black and silver glitter patterned card (which I thought kind of looked like fish scales ;) ) 1cm smaller than the card itself, and matted it to black card. I then attached it to the card itself using double sided tape.

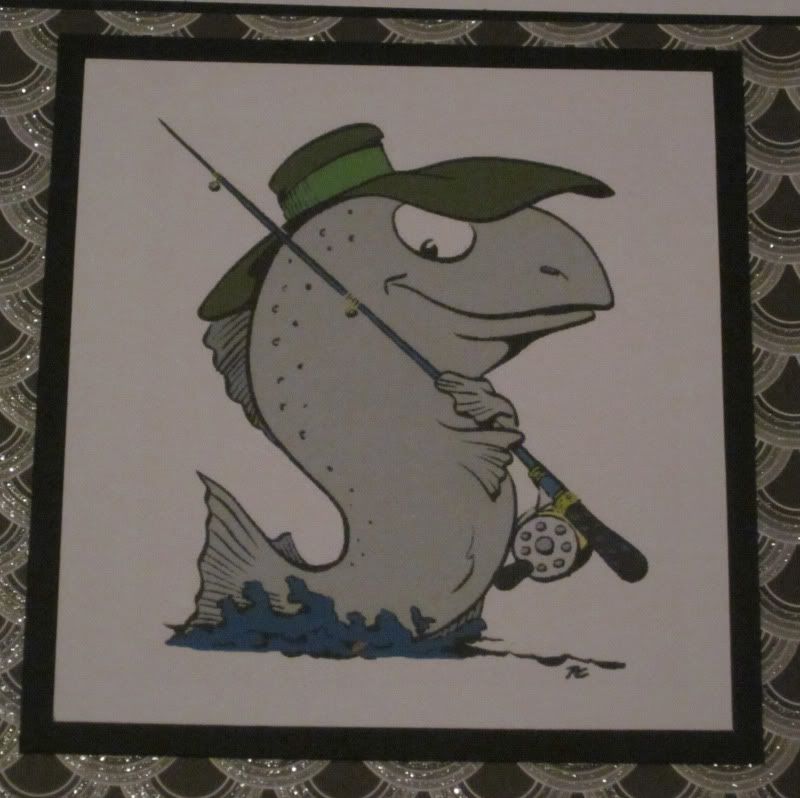
The image I used was a colouring page which I found using Google Images. I coloured it in using Photoshop, printed it on white card and trimmed it to a rectangle. I then matted it to black card and attached it to the center top of the card itself using double sided tape.

Lastly I made the sentiment by drawing 2 fish shapes on a piece of white card, I then cut them out and wrote the sentiments on them in freehand with a black marker on the reverse side. I then also matted them to black card. Next I attached them to a strip of black card, and then attached it to the bottom of the card itself.

Monday, 26 December 2011

A Christmas Card For Donna

I made this Christmas card for my good friend Donna from Smiley Crafter, but as it had to make it's way overseas to the UK, I didn't want to post on here until after she had received it. Hope you all like it. :D

A Christmas Card For Donna

I used white card as my base card, which I covered with a holly patterned card. I then attached a green satin ribbon down the right side of the card, and a red satin ribbon along the bottom.


I coloured in a Willow Design's "A Spot Of Gardening" Digi in Photoshop, printed it on white card and trimmed around it. I then used red polka dot paper to paper piece her skirt and red paper for her boots. I glued pieces of fluffy white fibre to the bottom edge of her skirt, and to the top of her boots. Next I cut a heart out of a free green swirl patterned paper from Free Digital Scrapbooking and a slightly smaller heart out of pastel green card. I attached the green swirl heart to the pastel heart with double sided foam tape. I then glued the digi in the center of the heart, and glued the heart to the card.

I then made a ribbon circle sentiment. Please see my tutorial on how to make these for more info. And glued it to the bottom corner of the card where the red and green ribbons meet.

I then glued a green pastel paper square to the inside of my card. I made and printed a "May your Christmas be merry and bright" sentiment in Photoshop and glued it to the center of the green square. Lastly I cut the back off a Christmas tree brad and glued it to the bottom right corner.

Sunday, 25 December 2011

Snowman "Gift Card" Card

I made this card last night to hold a gift card that we got my Uncle for Christmas. I am also entering it in this week's Willow Sketchie Challenge. Hope you all like it. :D

Snowman "Gift Card" Card

I used a white card as my base card, which I glued a slightly smaller square of free green swirl patterned paper from Free Digital Scrapbooking to. I coloured in a Free Sliekje Snowman Digi Stamp in Photoshop, printed it on white card and cut it into a rectangle. I then matted it onto a red polka dot paper and glued it to the left side of my card. I then made and printed out a "Christmas Wishes" sentiment in Photoshop onto white card, cut it out and glued it to the right of the digi.


Lastly I made and glued a red polka dot pocket to the inside of the card to hold the gift card.

This card was fun to make and I would like to thank Hazel from Willow Sketchie Challenge for a great sketch and recipe. Merry Christmas everyone :-* And good luck to all that enter :D

Reindeer "Gift Card" Card

I made this card last night to hold a gift card that we got my Dad for Christmas. I am also entering it in this week's Willow Sketchie Challenge. Hope you all like it. :D

Reindeer "Gift Card" Card

I used a white card as my base card, which I glued a slightly smaller square of red and white striped paper to. I coloured in my Free Reindeer Digi Stamp in Photoshop, printed it on white card and cut it into a rectangle. I then matted it onto a free green swirl patterned paper from Free Digital Scrapbooking and glued it to the left side of my card. I then made and printed out a "Christmas Wishes" sentiment in Photoshop onto white card, cut it out and glued it to the right side of the digi.

Lastly I made and glued a red and white striped pocket to the inside of the card to hold the gift card.

This card was fun to make and I would like to thank Hazel from Willow Sketchie Challenge for a great sketch and recipe. Merry Christmas everyone :-* And good luck to all that enter :D